

It's a Kaffe Fassett print called "Roman stripes" and the colorway is called "dusk." You can buy it online from Hawthorne Threads here. Careful when you click that link! I find all the different color options dangerously appealing.
I didn't have a project in mind when I bought this, but when I went through my collection I knew it would have to end up as Simplicity 2177, which is made for stripes.

I bought this pattern a while back after seeing the Slapdash Seamstress post this inspiration photo of a J. Crew dress, which is a pretty excellent match for this pattern:

Here is her post on her own make. I've had the photo pinned for quite a while, and the dress is no longer available through the J. Crew website. One thing that I think makes the Simplicity pattern superior to the J. Crew dress is the dart placement on the bodice. You can kinda see on the left side of the J. Crew dress that the dart cuts across the stripes, creating an awkward offset in pattern. The darts on the Simplicity pattern are in the center and point from the triangle inset in the direction of the stripes, so it minimizes the offset that happens. (Or at least it seems that way to me.)
Actually, at first I thought I didn't want darts on the front at all, so I went through a bunch of effort to convert them to gathers. I didn't follow a tutorial, so I'm not sure this is the proper way to do this, but here's what I did. First I closed the dart, transferring the dart to the armhole...

Then I closed up the armhole and transferred the excess back to the front again, only this time in many small slashes...
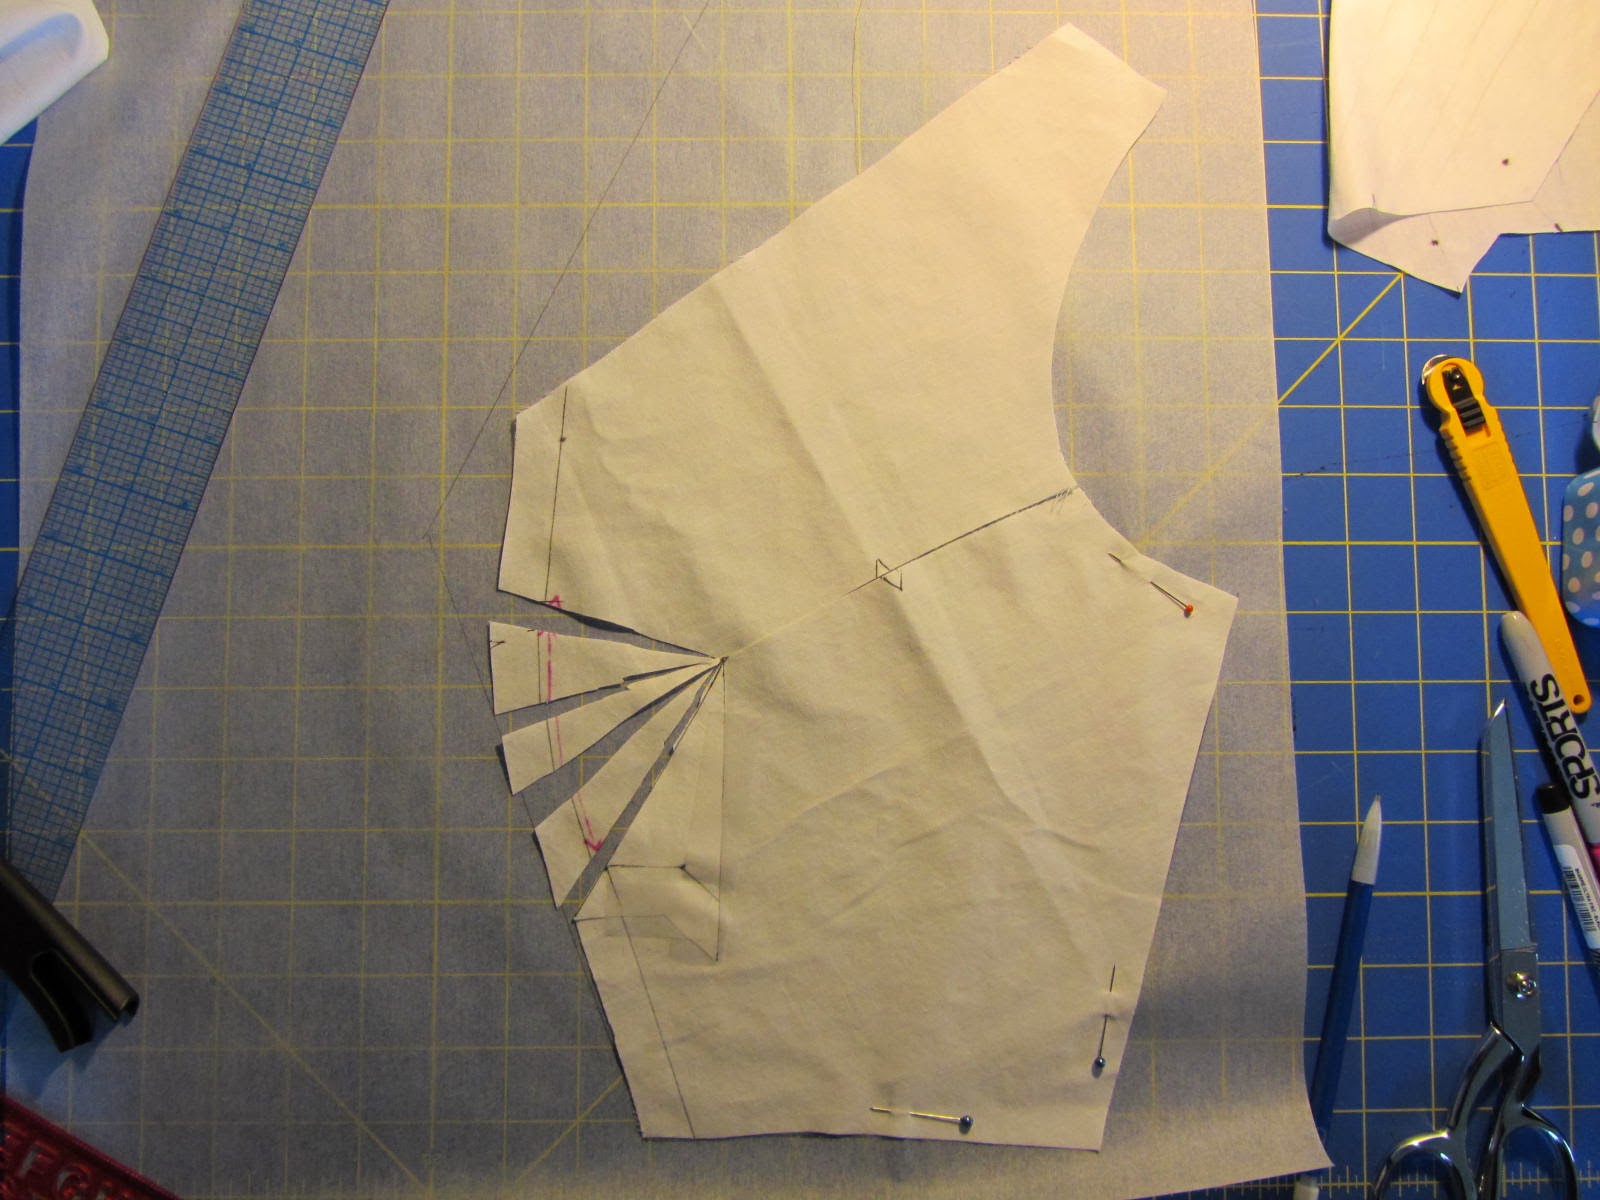
Then I filled in the space between the slashes and marked a gather on the spot. I hope that makes sense! If there's a nice tutorial out there for this process, lemme know. After all that work, I didn't even like the way the gathers looked, so I ended up going with the original design. I guess I was thinking that gathers were the best method for not interrupting the striped pattern, but maybe the angularity of a dart goes well with the lines of stripes?
I'm glad I made a muslin, because I ended up making several pattern adjustments. I had to get rid of some gaping at the back neckline by transferring the excess to the dart at the waist. I also had to take in a little gaping at the front armhole, transferring that excess to the bodice dart. It was my first time trying both these alterations and it worked great. What else.... oh. I had some tightness in the back. This was a weird one, because I had to slash and spread, but that combined with the back neckline alteration was really messing with my head. My darts in back are now pretty big, but the fit is good, so I'm going with it. I love it when you go through all that geometric tinkering with a pattern and then it actually WORKS. Amazing. I'm actually sitting in the couch in my muslin of the dress right now, and it's feeling pretty comfy. It's good to wear your muslin around the house for a while. It's really the only way to tell if you've gotten a good fit. For instance, at first I thought this dress was a little long and that I should maybe take a few inches off the hem. But then while sitting at the sewing machine I noticed that it rides up quite a bit when I sit down. Makes sense, since it's gotta curve over my booty when I'm seated. So I'm leaving the length alone.
I'm underlining the dress in cotton batiste, because it's rather thin material. Tonight I finished attaching the underlining to the main fabric.

At first I considered hand sewing the two together, since it's easy for the fabric layers to slip around when doing this part. But instead I just put my walking foot on my machine and went for it. It worked just fine - I didn't even pin a lot of the edges. I guess all that money I shelled out for my walking foot was worth it. Maybe I'll use it more often. You can't see it in this photo, but I sewed strips of organza around the armholes and the back neckline of the bodice so that these areas won't stretch out. I didn't bother doing this for the neckline, since it's not cut on the bias. Is that reckless? Instead, I just used a short stitch length to attach the underlining to the main fabric, and I'm hoping that this stay stitching is enough.
Here's the front of my bodice sewn up:

Isn't it so prettyyyy? I love the colors in this fabric. They are like autumnal jewel tones. I showed Josh, and he was not such a fan. He asked me if I ever considered sewing with solids. SOLIDS. As if. He wasn't a fan of my birthday dress fabric either. He said the zigzags looked kinda 80s. Clearly, there is a discrepancy between his tastes and mine. Is my style too loud? Outdated? I know I'm not riding the front end of the trends, but I think this striped dress is gonna be awesome. What do you think?

Love 'em. Maybe I'll have to go back and buy another couple yards of one of those...
Ohhhhh, it's looking gorgeous so far! I love that J. Crew dress but I think I like your fabric's colors even more. Can't wait to see it finished!
ReplyDeleteNice! I love Kaffe Fasset's fabrics and knitting. I think you made a great choice. I can't wait to see it finished, too.
ReplyDeleteIt's looking great & you chose the Perfect fabric for it!
ReplyDelete:-)