Sunday, March 31, 2013

Summer Sewing Schemes

Usually I laugh at people who complain about the weather. I'm a hardy Montana girl, and people in Indiana are whiny babies about the cold. Then again, people in Montana are whiny babies about the heat. But even I am growing weary of the cold as April approaches. Instead of this...

I guess it is nice to get a lot of wear out of my new Minoru...

isn't it almost time for some of this...

...but shorts and blouses are sounding awfully nice
Oh man... remember what grass feels like on bare feet? Can't wait! So I'm sewing and scheming for the weather I want. First up, I'm working with some prize fabric i bought during our trip to Maine last summer - a voile from Amy Butler's Soul Blossoms collection. This particular pattern is called "Night Tree" and the color is "Lime Peel." 

image from here
I'm attempting to make McCalls 6550 with it, a blouse pattern from the 1970s.


I was going to make view C, but I have run into some... difficulties... which may necessitate making sleeveless version view D. And it's all because I was too lazy to try my hand at pattern grading. Shame shame. On a different note, I would like to loudly proclaim that I love 70s sewing patterns. I LOVE THEM! Moving on...

I went on a small, online fabric shopping spree last week when I discovered I had a positive PayPal balance from something I returned. Do you ever do that? I know it's not really free money, but I decided to interpret it that way. Fabric.com was having some good sales (20% off your total purchase) as well as free shipping on orders over $35. I spent a delicious hour perusing the sales, imagining different possibilities and playing with yardages to keep it within my PayPal amount, and finally ended up with these:

don't they look enticing on my newly painted table?
From top to bottom we have a striped black cotton gauze, Robert Kaufman's Carolina chambray in black, Robert Kaufman's Essex linen in ivory, and a cotton stretch sateen ikat print. I'm always a little nervous whenever I buy fabric online, so I usually try to stay with names I trust or - even better - specific stuff mentioned on Pattern Review. Kaufman seems to be a good bet and never very pricey. The gauze and the ikat were gambles... but I think they paid off!


Here's the gauze held up to the light, to show it's cool stripey pattern. I'm thinking about making this into a pleated top, like this loose fitting t-shirt from Salme patterns:

link
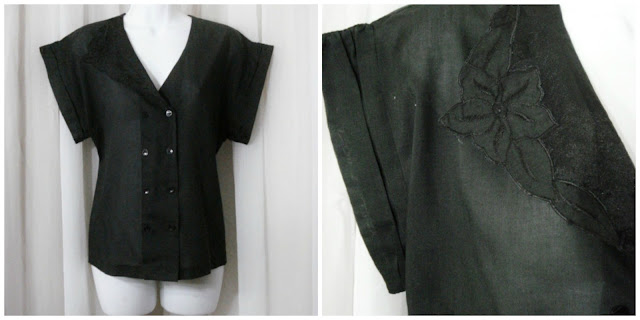
But I also saw this blouse on Etsy, which has made me think twice about how to use this fabric.

and you can still buy it....
Don't you love that asymmetrical collar? And the flower embroidery? I would love to try to recreate this, and Burdastyle has a blouse pattern that's quite similar...


I love finding patterns that match up this well!

Moving on to the ikat print...


I really love the colors in this. I was thinking about being very practical, and making shorts or a skirt that would get a lot of wear. I'd like to try Grainline's maritime shorts, or the paperbag-waist skirt on Simplicity 2413:


Orrrr I could make myself a birthday dress!


The dress on the left is a Betsy Johnson number, and I happen to own Colette Pattern's Lily. Now picture my zigzaggy ikat in place of that floral print, with black accents... and maybe I'll reshape the neckline to mimic the sweetheart neck on Betsy Johnson's dress. Hmmm.....

What's everyone else dreaming of for spring? And anyone want to weigh in on my sewing decisions?

Sunday, March 24, 2013

Wedding Dress Saga - A Tale of Two Sisters

Me and my sis, Katie, have a bit in common...


Aside from being intelligent, charismatic, and good looking, we are also both pretty goofy, crafty, and have similar aesthetic sensibilities. Not to mention we look a lot alike and have almost identical voices. We are also of a similar size...

however I have a sun room, and Katie must take photos outside in winter in Montana... brrr
All these things I think will combine for a very successful wedding dress collaboration. So far, we have had only one minor hiccup...


...involving a duct tape dress form. Have you ever made a duct tape dress form? I thought this was an excellent way for me to fit a dress on my sister who lives a couple thousand miles away. I instructed her on how to make one, told her not to bother stuffing it (I could do that part), and asked her to send it in the mail to me. Katie did just that, but to save on postage she decided to pummel her dress form as flat as possible and ship it in a flat envelope. When it arrived I just kinda stared at it - puzzled and highly amused at the destruction done upon her dress form as a result of a slight failure in communication. I did my best anyway, trying to stuff her torso back into its proper shape. And sadly, I disemboweled Eileen... reusing her stuffing on Katie's dress form. Yes, it felt disturbing to do this. But on the bright side, I recovered some interesting fabric inside Eileen which apparently I didn't fancy years ago when I first made her. It was like a pinata! A pinata shaped like... ME.

Katie on the left, me on the right. No, I'm not shorter! Eileen is just sagging from lack of stuffing.
I stuffed the new dress form, but unfortunately no amount of stuffing could restore shape to one half of the bust, and the dress form torso from the waist down is almost a perfect cylinder - while I'm fairly certain Katie is not. I found it amusing to leave the two forms sitting side by side in the living room for a while, but eventually Eileen became quite saggy and depressing - only a shell of her former self - and I had to throw her away.

While I have yet to use the new dress form (remind me Katie, what's her name?), I had good enough success just taking my sister's measurements over the phone and altering the bodice of the pattern accordingly.


You can see by the photo above that it's a pretty good fit! I have to lower the darts a little, or perhaps shift them to the side. Katie would also like a little wider neckline (drawn on the muslin with marker), and we will narrow the shoulders a little.


We are also planning to cut a deep V out of the back. I hope this doesn't make the shoulders slip off, but I think it should be okay. And finally, I altered the skirt a bit from the original pattern to get the front and back lengths Katie was looking for. With the circular shape and hi-low cut, this was a big pain in the butt. We also decided to overlap the top skirt pieces in the front, which was an easy change.


After one more Skype call today, the dress is back on its way to me for modifications. While its tempting to rush things, I think I am going to make all the necessary changes to the pattern and then sew up a new bodice for her to try on. I want to be super duper sure that it's an excellent fit before I start on the real deal.

Have any of you ever tackled a project for someone far away? Have you ever sewn a wedding dress or worked with lace? Got any tips for me?

Tuesday, March 19, 2013

A Selfish Seamstress Slipup

I made my first forays into sewing at about the same time that I discovered The Selfish Seamstress of sewing blog fame. I love Elaine's style, her skill, and most of all, her unabashedly (tongue in cheek) selfish principles when it comes to sewing for other people. I myself am extremely selfish when it comes to sewing. But occasionally the Selfish Seamstress slips up. Most recently, she compromised her principles by posting a free pattern for this very chic faux fur pullover...

want? click here
And I have slipped up too - twice. First, there's the giveaway to announce. Only six people entered! Those are some good odds. Congratulations...

Maryall! I'll email you for your address soon so I can send these patterns off. Everyone else - don't worry! There's more where that came from.

My second slip up is somewhat larger than giving away some sewing patterns. I agreed to sew something for someone else. It might have been a mistake (I hope not!), but I've agreed to sew my sister's... wedding dress.

Before anyone starts laughing hysterically at this foolish move on my part, let me say that my sister is a very relaxed sort of person, not at all demanding, and she's having a casual outdoor wedding and is not looking for any kind of big poofy ballgown, nothing corseted or jewel encrusted, and no silk charmeuse, bias cut gown that would make me break out in a nervous sweat. Whew. It is daunting sewing something for someone who lives a couple thousand miles away, but I think we will overcome those challenges. With the help of Pinterest, we amassed a bunch of inspiration until I had a good idea of what she wanted...

The style I think is best summed up as ... bohemian/country/diy couture? My sister was about to buy a dress off Etsy, made by a lady who reclaims old petticoats and slips and combines them into dresses with a sort of shabby chic appeal. I like the idea, but I know from experience that a lot of petticoats found while thrifting are made of nylon, polyester, acetate, and other synthetic materials that don't look as nice as natural fabrics, don't feel as nice against your skin, and will feel hot as hell during an August wedding and while kicking up your heels on the reception dance floor. So you see, I had to intervene. I can make something similar, out of nicer fabrics, and for less money (but a lot more time).

It wasn't hard to find sewing patterns that gave us the dress silhouette that Katie (my sis) desires. We decided on two McCall's patterns - one from the 1970s and one that is contemporary:

McCall's 3643 (bodice) and McCalls 6698 (skirt)
I've sent the muslin to her to try on. Many updates to follow!


Wednesday, March 13, 2013

Pattern Giveaway!

HEY-OH!

Did anyone check out the beautiful array of shift dresses that Sarai posted for inspiration yesterday?

photo collage from Sarai at Coletterie
Shift dresses aren't generally my favorite shape, but Sarai just might have convinced me that even pears can wear shift dresses. I am seriously tempted to put a shift dress on my sew-this-soon list. The comment chatter over at Coletterie suggests that maybe Sarai has a shift dress pattern in the works, but in case you don't wanna wait for the release...

It's time for another pattern giveaway! I have a shift dress pattern up for grabs, along with several others. I also wanted to celebrate finishing my Minoru - which felt like an epic battle at times - by giving some love back to the sewing community. Maybe I'll do this every time I finish a project. Hmmm.  Also, we'll be moving to a new house in the summer, and I don't wanna haul a bunch of sewing patterns with me that I never intend to use. So help me out! Here's what I'm offering this time...

Butterick 3243 - Bust size 34" - Cute shift dress pattern with clever pocket placement!


Simplicity 8703 - Bust size 37" - A sailor girl dress for summer? It's missing the envelope, but the pieces should all be there.


Simplicity 7024 - Bust size 36" and 38" - I don't find this very exciting, but maybe one of you will.


Butterick 3738 - Bust size 36" - These camisoles are pretty darn cute.


Simplicity 5475 - Bust size 39" - Another shift dress! Sorta. A shifty dress. It's sorta A-line, but that's just what would make it work for another pear shaped lady like me.


To enter the giveaway, please leave a comment below with a link to something you are sewing (or would like to sew) for spring! It snowed again today, so I could really use some sunshiney inspiration up in here. I'll close the giveaway on Saturday at noon and choose a winner.

*EDIT*  Forgot to say, I'll be selecting one lucky person to receive all five patterns. I'd divvy them up, but I have a box full of patterns to give away (eventually) and if I ship them all individually the postage would add up to quite a lot!

Sunday, March 10, 2013

Sad pear, keepin it thrifty, and a bag that fits the bill

Last Friday I had to go to an interview. Times being tough and competition being fierce, I was more than a little stressed out about presenting the correct image. And times being tough, I didn't want to drop a lot of money on a classy outfit, but I wanted to be classy nonetheless. Boy am I glad I can sew.

Now, I didn't have time to whip up a clever dress for the occasion. How I wish I did. I went to Goodwill hoping to score big... and I did find a oh-so-perfect-dress. It was a simple black wool sheath with short sleeves, from Talbots. It fit like a glove on top. But I'm a pear, and the bottom was a serious squeeze to get into. No amount of letting out seams was gonna fit my derriere into that dress gracefully. It was a major disappointment. Imagine - a perfect interview dress for $6. If only! So I went home feeling defeated and wasted a bunch of time browsing websites for career clothes... Talbots, Ann Taylor, etc.

images from Talbots and Ann Taylor
The thing is, most professional looking dresses for women have slim fitting skirts. And if you're pear-shaped like me, you've probably learned that these shapes on RTW just won't work for you. I only have to glance at a dress and know it won't fit. Unless a dress has a generous amount of room at the hips - for example an A-line or a flared skirt - it's a no-go. Shopping for career clothing can get very frustrating very quickly. In the end, I took something I already owned and made it work. But sometime soon I would like to tackle a classy career dress made to my measurements. No more staring woefully at RTW dresses that will never work.

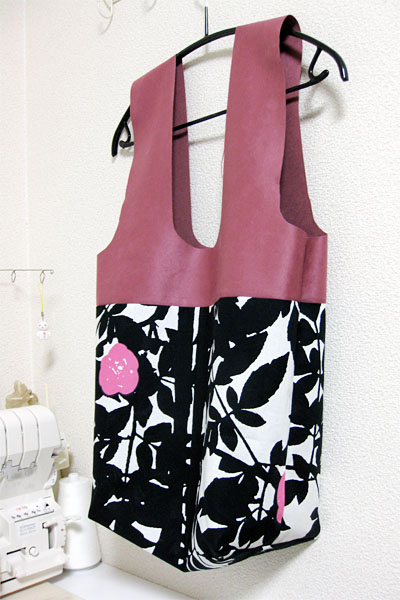
This story does have a bright ending though. Aside from the clothing conundrum, I wanted an inconspicuous bag to carry to the interview. I only own one purse, and it wasn't gonna cut it. I might not have had time for a dress, but a simple bag I did have time for. And I knew just where to turn... I've had Yoshimi's Hatoto bag bookmarked for at least two years.


It's an extremely simple shape. I think Yoshimi is just such a classy lady herself that she makes this bag classy too. So I decided to make one. And of course, looking to save money and time, I took materials from the thrift stores...


The dress on the left is wool, with minimal shaping. Ideal for repurposing! And the coat on the left is a faux suede, I think. Funny, Yoshimi's bag above is made from pink faux suede. I actually liked this pink coat. I was tempted to just do a refashion on it. But the armholes were too big, and that's one thing I've learned I can't fix easily. Plus it has a lining inserted, and the idea of changing both the outer fabric and the lining and getting them to fit back together nicely? I'm tired just thinking about it. So... on the chopping block it went!


I used the grey wool dress for the outer part of the bag, and I used the pink polyester lining of the coat for the bag lining. I underlined the wool in some very stiff sew-on interfacing to give it a little shape. While Yoshimi doesn't provide a pattern for a lining, she does show this photo of a bag in progress...


I followed her lead and made the upper part of the bag lining in the wool. And I used up the last bit of some black piping as an accent between the two fabrics.


I also added a zippered pocket, and a small pen/pencil pocket. For now the pen pocket is swinging loose. I could tack it down. I haven't decided.

Considering I rushed this project to finish it in time for my interview, I'm very happy with how it turned out. It's a nice size for holding papers, a notebook, even an iPad. And toward the end of the day, I stashed a pair of comfy shoes inside. The outside is nothing exciting, so I love that it has a bright interior.

In short, my sewing skills couldn't deliver a dress in time for an interview, but they did deliver a much needed accessory and for much less than I could have bought one. I probably spent $10 altogether on the thrift store materials. And I think I can get another bag out of what I have left. This time, a pink faux suede outer, and the black lining from the dress for the interior? And if people are interested, I'll do a tutorial next time since I won't be so rushed!

Saturday, March 9, 2013

Finished Minoru!

I took a blogging break - but I'm back with things to show off! I finished my Minoru jacket.


And just in time for a little extra winter! Around here in Indiana, everyone has been complaining for the past few weeks about the cold. Now, I'm from Montana, and all I can say is - IT'S FEBRUARY (or was, at the time of these complaints) IT IS SUPPOSED TO BE COLD. Also, I needed it to stay cold so that I could finish sewing my new coat and have time to wear it.


I guess the snow gods heard my plea for an extension, because we just got a little extra winter dumped on us. Whee! I want spring like every other person, but I'm willing to wait. Especially if it means getting a little extra wear out of my newest creation.

My Minoru is heavily modified. It's a bad habit of mine - picking a pattern and then changing it so much that I probably should have just chosen a different pattern. In this case, I really liked the Minoru pattern and all the good reviews I've read... but I also have always wanted a duffle coat. I was largely inspired by two other Minorus:

Karen's lovely camel wool Minoru...


and Miss Jackson's cozy Minoru with flannel lining and front placket...


I wanted my jacket to be wool like Karen's, despite the pattern being designed for lighter fabrics. I wanted the front placket like Miss Jackson's. And I wanted toggles, and a detachable hood (that's also lined), and side seam pockets. Oh and I didn't want the gathered cuffs. I think that's everything.


The outer fabric is a dark greenish blue wool coating from Denver Fabrics. The interior is a soft flannel from Fabricmart when they were having super deals on flannel. $3/yard I think. I pre-washed it twice to make sure it did all it's shrinking before I sewed.


I wanted the sleeves to be lined with cozy flannel too, but my sewing instructor wisely recommended a more slippery material. Getting the jacket on and off would be a pain otherwise. I compromised by using a bemberg rayon but underlining it with the flannel, to keep the cozy factor.


I didn't want the zipper exposed on the outside or inside, so I ended up doubling the width of the front center pieces and laying the zipper between them. But then I realized I didn't want to just topstitch the zipper down and have its edge exposed. So I had to cut the placket in half and sandwhich the zipper in the middle. You can kinda see what I mean in the photo below.


For the leather toggles, I snagged a leather skirt from Salvation Army and hacked it up. The skirt still had its original price tag on it. Guess how much?

$400.

Yikes! I definitely hesitated before cutting into it. It seemed a shame, but I didn't need a size 2 leather skirt. I needed leather toggle patch thingies. So that's what it became. I have a lot left over, and I'm scheming up some different ways to use it. Maybe a leather panel skirt, once again ripped off from Karen? To make my toggles, I referred to Gigi's duffle coat here. I didn't do it exactly the same, because I lacked a leather hole punch and the special leather glue she refers to. Oh well! At this point I just wanted to get the darn thing done. Topstitching the leather was a royal pain. It was very difficult to maneuver the jacket around to make those tight curves. I can see why square patches like Gigi's might be preferable. It would be much easier to sew straight lines that the curves I concocted. But at some point you have to say, "that's good enough!" I examined the sewing on a RTW toggle coat I have in the closet, and my stitching really isn't any worse. And I very much doubt most people will notice or nit pick. So that's that.

One thing I am proud of on this coat is the detachable hood.


I knew my wool was much too heavy to try for a concealed hood as called for in the pattern instructions. That would have been a seriously bulky collar. So I decided to do a detachable hood like my current winter coat. I sandwiched one half of a separating zipper between the hood and hood lining.


I topstitched the other half of the zipper to the outside of the collar, and made a little flap that covers it when the hood is detached.


I really like how the hood and collar turned out. Other random adjustments... I added a little room at the elbows of the sleeves because I felt a little constricted when I bent my arms in the muslin version. I was supposed to add some width to the hips, but I was lazy about making that adjustment on my paper pattern, and as a result I completely forgot when I cut out my fabric. To compensate, I added a triangular gusset to the center back. This was not a perfect fix, but it's not very conspicuous so I'm okay with it. I also did the side seam pockets according to Amy's tutorial, but I forgot to take photos. And I left the elastic out of the cuffs. But this post is long enough already!


All in all... I like my coat! There are some small things I might change if I were to redo it. For example, I think the plackets are too wide in front and it takes a little fiddling to get them to lay flat under the toggles. I've been staring at customer's coats when they come into the coffee shop when I work, to see how the plackets are handled. most don't have a wide overlap like mine. And most use a lighter material to make the underlying placket - the one that keeps the cold zipper from touching your skin. That makes a lot of sense to me, because this heavy wool was definitely a challenge to work with on the plackets. Still, I fit all the changes in, and I think it worked out okay. But next time I find myself making a fifth or sixth modification to a pattern, I'm going to make myself step back and reevaluate. I love this jacket, and I think I should definitely make it again... this time staying truer to the original!