Friday, January 7, 2011

Lamp Revival!

I've collected a few vintage-y looking lamps in the past few months, of which I am very fond.


And the newest addition:


And they all have similar styles! How lucky. The first one came from a vintage store, but the second and third I snagged from Goodwill on separate occasions. I consider this quite a feat, since our Goodwill is nothing to brag about. Unfortunately, lamp #3 was not in great condition and the darn Goodwill lady didn't give me a discount. Is it bad to haggle at Goodwill? I thought $15 was a lot since the lamp was missing so many pieces and needed repairs. Oh well. Still cheaper than I would get elsewhere I suppose. Anyway, as I stood in line to checkout, the helpful man in line behind me told me I could get the pieces I need easily at the hardware store and do the repairs myself. So I did. Here is what I bought:


It's a socket. And it was quite easy to install. All you need is a screw driver. I should have taken pictures as I went, but I didn't. This website, however, provides guidance and pictures for fixing up a lamp. Praise the internet! You can learn anything! But really, for just replacing a socket you don't need instructions. Except for maybe, DON'T DO THIS WITH LAMP PLUGGED IN. But that is obvious, I hope.

Then, feeling handy and crafty, I decided to tackle a project which has been lingering for many months in a corner of our tiny living room: covering a lampshade with pretty paper. The before version is the first lamp picture (at top). The finished version is this:


The simple drum shape of this lampshade made the project much easier. All I did was cover the shade in Mod Podge (I used the matte kind), rolled it over carefully over the paper, and then trimmed the excess off leaving a little on either end to fold over to the inside. Here is a view of the inside:


You can see that there is only a very little bit folded to the inside. I initially had too much, like this:


The problem of leaving so much extra is that when I turned the lamp on, it was visible on the outside - like an ugly, dark, uneven border. So I had to trim it back. Finally, I brushed a layer of Mod Podge over the top of the paper to protect it. The paper was quite delicate, and the Mod Podge creates a sort of plastic film over it. I might go back with a second coat, just to make sure. Mod Podge looks like Elmer's glue in the bottle, but it dries clear.

You can also cover lampshades with fabric, although you might want to experiment with different types of glue. Here is nice tutorial showing how, on a blog I just discovered: Isabella and Max Rooms.

tutorial
I would love to see how people tackle more complicated lamp shade shapes (tongue twister!). For now, I'll stick with the simple ones. Here are a few tips to keep in mind:

  • Test your paper first by holding up against the shade with the light on. Some papers may not be transparent as you like, or too transparent, and imperfections on the shade might show through.
  • Shades that look like simple cylinders may be wider at one end or another. Make sure to leave yourself enough room on your paper or fabric for the curved shape that these form when laid flat.
  • Carefully smooth out bubbles and wrinkles as you wrap.
  • Cover the ENTIRE outside of the shade with Mod Podge when covering it with paper. I didn't at first and it created lots of unsightly bubbles.
  • Where the paper overlaps at the back (the seam) keep the overlap narrow and neat. Depending on how transparent your paper is, this seam will show.

Tuesday, January 4, 2011

Wenlan Blouse

My little sis's birthday is coming up...


and I'm thinking it's about time I made her something. This photo of her is five years old, and these days she's turning 23... 23! Geez. She is a far more artistic sort than I - a photographer, knitter, baker, all-around accomplished person. She even has her own blog that shows off her photography. I'm continually impressed by the things she makes. Even the little stuff. For example, this Christmas she made bacon for the thirteen people staying at our parents' house by cooking it in the oven on a cookie sheet covered with wax paper. Genius! And even though we did secret Santa this year, she had homemade gifts for almost everyone in the family. She knit me a beautiful hat in deep purple, which I have already lost and am very mad about.

So anyway, I want to make her something nice. She doesn't sew (yet), so this is my opportunity to use one of my skills for her. The fabric she sent me is a sort of slippery synthetic with red polka dots:


It's very much her style. I was thinking about this blouse from BurdaStyle:

Wenlan Blouse
I reallly love the version that Cupcake Goddess made of it, here. But I'm thinking I will eliminate the turtle-neck bit, since Katie wasn't into that. The other issue is, I don't want to use allll polka dot for this. I'd much rather do something sheer for the bib part like in the photo above. But of course, the local Joann's has nothing to offer. Will this be my first foray into internet fabric shopping? To be continued...

Monday, January 3, 2011

Knitting v. Sewing

While home for Christmas (which was a fantastic, if frantic, time) my mom and I managed to steal a little time to get me started on my first knitting project. I can see a lot of advantages to knitting over sewing - it's less time-consuming (well... sometimes), requires less materials, requires less space, is easily transportable, and has a huge community of people who are usually pretty visible. Meaning, if I wanted to seek out some people to knit with and to learn from, it wouldn't be any problem. With sewing, not so easy.

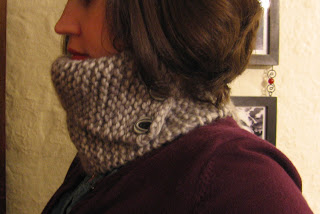
So without further ado, here is my completed wham bam thank you lamb! neckwarmer, courtesy of Susan Chang's pattern on Ravelry.com.


Not so bad! You have to have a membership to join Ravelry.com, but it doesn't cost anything, and so far they haven't sent me any obnoxious emails or newsletters. The pattern is very simple, but I still needed Mom's help. She's an expert knitter and walked me through it, until I had to finish it up back home in Bloomington. Then I called her up whining about seaming the two ends together. I searched and searched for a tutorial, and there's lots out there on youtube, TECHknitting, knittinghelp.com, Ravelry.com, and so on - but none that explained exactly what to do for this particular type of stitch. So I got impatient and just winged it. It's less than perfect, but it's totally warm and wearable, and I'm satisfied.

The next pattern I'd like to try is the honey cowl by Madelinetosh, also on Ravelry.com:


Cowls just seem like perfect beginner material. Plus, no loose dangly ends like scarves. But what do knitters do when it gets warm out? I've looked at patterns for "shirts", vests, skirts, dresses, and I'm not convinced. Unless you are an Irish lass skipping around the countryside, I don't think you can pull off most of those looks. For example:


Lovely, but this girl couldn't even think of something to pair with it, except for mermaid hair.